Understanding what to do to install a projector screen on a wall is essential for building the home theater you’ve dreamed of. Whether you’re a construction professional or home theater DIY’er, mounting a projector screen to drywall might seem daunting at first, but with the right tools and preparation, it can be a straightforward process.
If you follow this blog you'll already know how to ceiling mount a projector. But now you can learn how to hang a projector screen onto your wall.
A securely mounted screen ensures optimal viewing, safety, and longevity. This guide will walk you through everything you need to know to get your projector screen up on your drywall safely and efficiently without damaging your wall.
When building a home theater or using a pre-existing room, it's very common to find the wall made from drywall.
Drywall, also known as gypsum board, sheetrock, plasterboard or wallboard, is a common building material used for interior walls and ceilings in homes, offices, and other structures. It’s favored for its ease of installation, cost-effectiveness and versatility. Because many home theater rooms will use gypsum boards so knowing how to hang your cinema screen on sheetrock will be a valuable skill to know.
Disclaimer for Hanging Projector Screens On A Wall
Regardless of if you’re hanging your projector screen on drywall or any other surface, the information provided in this guide is for general informational purposes only and is not intended to replace professional advice or consultation. While we have made every effort to ensure that the instructions are accurate and applicable to common home environments, the strength and condition of your walls, drywall and mounting hardware can vary significantly.
Projector screens are heavy and require secure mounting. We strongly recommend locating and mounting to wall studs or using heavy-duty anchors specifically rated for the weight of your screen. Improper installation can result in damage to your walls, injury, or damage to the projector screen.
Please note:
- Always follow the manufacturer’s guidelines and instructions for mounting your specific projector screen model.
- Use appropriate tools and hardware for the job, and seek assistance if needed.
- If you are unsure about the structural integrity of your walls or your ability to perform the installation, consult a professional installer or contractor.
- We assume no responsibility for damages or injuries resulting from improper installation, incorrect use of tools or materials, or failure to adhere to building codes.
Gather Your Materials
If you’ve chosen to hang your projector’s wall screen, the first step will be to collect all the components. The materials you’ll require will differ based on the kind of screen you’re using and the method of installation you decide to use, however, there are some items that are required regardless of what.
- Wall mounted projector screen
- Kit for wall mounting (Typically included with the screen that includes the brackets, screws and drywall anchors)
- Pencil or marker
- Drill
- Level
- Measure tape
- Stud finder (optional)
- Masking or painter’s tape (optional)
Things To Consider Before Mounting Your Projector Screen
Before you start drilling into your sheetrock here are a few of those things you might need to consider.
1) Screen Placement
The mounting placement of a projection screen depends on various aspects, like lighting conditions, projector placement and screen size. You can learn all about optimal screen placement in our guide to designing a home theater. As a summary here are the things to consider:
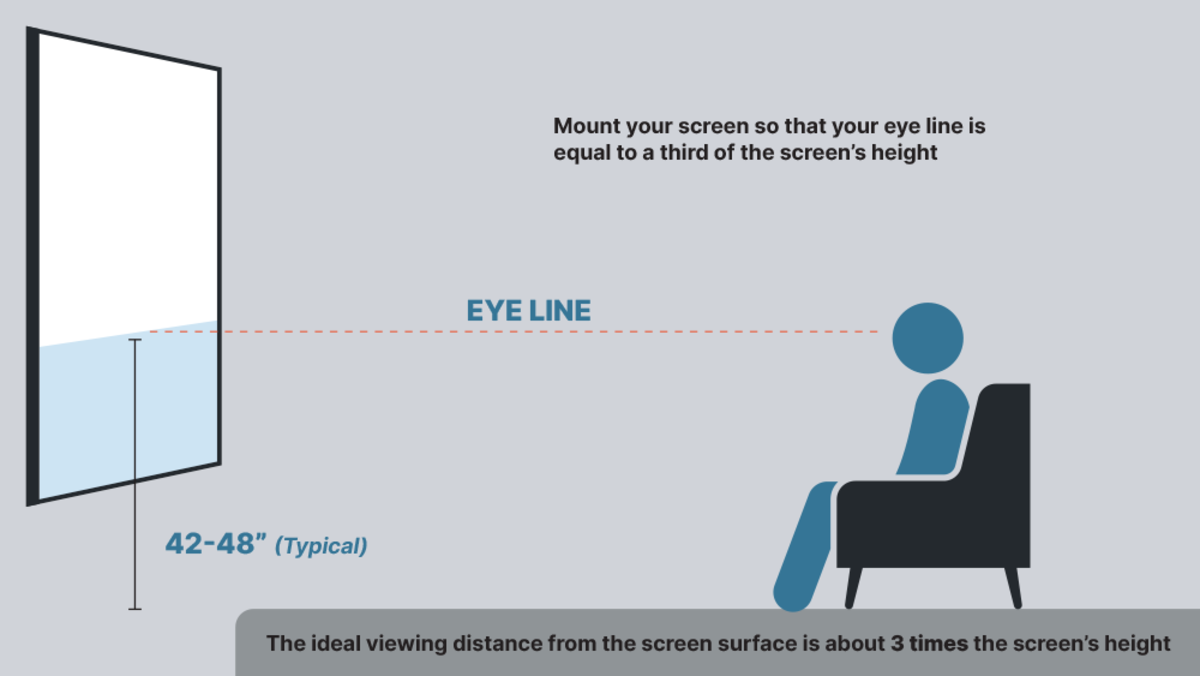
Viewing Distance: A general rule is to place the screen at a height where the bottom of the screen is around eye level for seated viewers. Depending on the size of your screen and your room setup, the bottom of the screen should typically be 24-36 inches from the floor.
Room Layout: Ensure there's enough space between the screen and your seating area to avoid neck strain while watching.
Projector Alignment: Your projector and screen must be properly aligned. Make sure the projector’s throw distance (the distance between the projector and the screen) is appropriate for the size of the screen. If there’s an obstruction like a ceiling fan you can often use the projectors lens shift to avoid it.
It’s a good idea to hold or mount your projector where you want it, and then project the image where you’ll want the screen to be. Use painter or masking tape to mark off the position.
2) Type of Projector Screen
There are several different types of wall mounted projector screens. These include pull-downs, fixed frames, and motorized screens. Each has its specific purpose and functions, so it is crucial to know each before deciding which to purchase.
Fixed frame projection screen:
Fixed frame cinema screens are a kind of projection screen that can be permanently installed on the wall. This kind of screen is well-liked by homeowners and home theater enthusiasts due to its professional and clean look. It’s pretty straightforward to install, however we would recommend having someone help you mount on the drywall so you avoid damaging the screen when trying to hang it.
Motorized projection screen:
A motorized projector screen is a type that raises and lowers the surface using a motor that’s controlled via remote control. Depending on the size of the screen it may be easy enough to mount on your own. One thing you’ll need to consider is how you’ll be running power to the screen. You may need to run wires through the drywall or you could use a rechargeable battery powered electric screen such as the Screen Innovations Solo 3.
Pull-down projection screen:
A pull-down projection screen is another type of wall mounted retractable screen that can be manually pulled down when you need to use it. This type of screen is very popular among offices and schools because it is very easy to use and install. Because these will be yanked on, it's especially important to securely mount a manual projector screen.
Steps On How To Mount A Projector Screen On Drywall
Now that the above factors have been considered, it's time to learn how to hang a projector screen on the wall. Hanging the screen should take around 30 minutes to do. Make sure not to rush and double check your measurements before you drill any holes into the plasterboard. Soon you'll be able to enjoy larger than life movies and TV in your own home.
Here's the step-by-step installation process for wall mounting projector screens:
Step 1: Find the Studs (Recommended)

If you’re mounting the screen to a brick or concrete wall, it’s possible to bypass this step. However, if you’re mounting it on drywall, it’s an excellent idea to locate the wall’s studs. Many home theater screens are heavier than the recommended drywall hanging weight. Especially cinema screens 150 inches and over. Studs offer a more secure anchor point for the screws than the drywall anchors.
There are a few methods to locate Studs:
- Use a Stud finder. It is the simplest method.
- Find nail heads. If you notice the small head nails protruding from drywall, there’s a good chance that there’s a wall stud behind the nail heads.
- Knock on the wall. Studs make a robust and rich sound when you strike them, whereas drywall will sound hollow and dull.
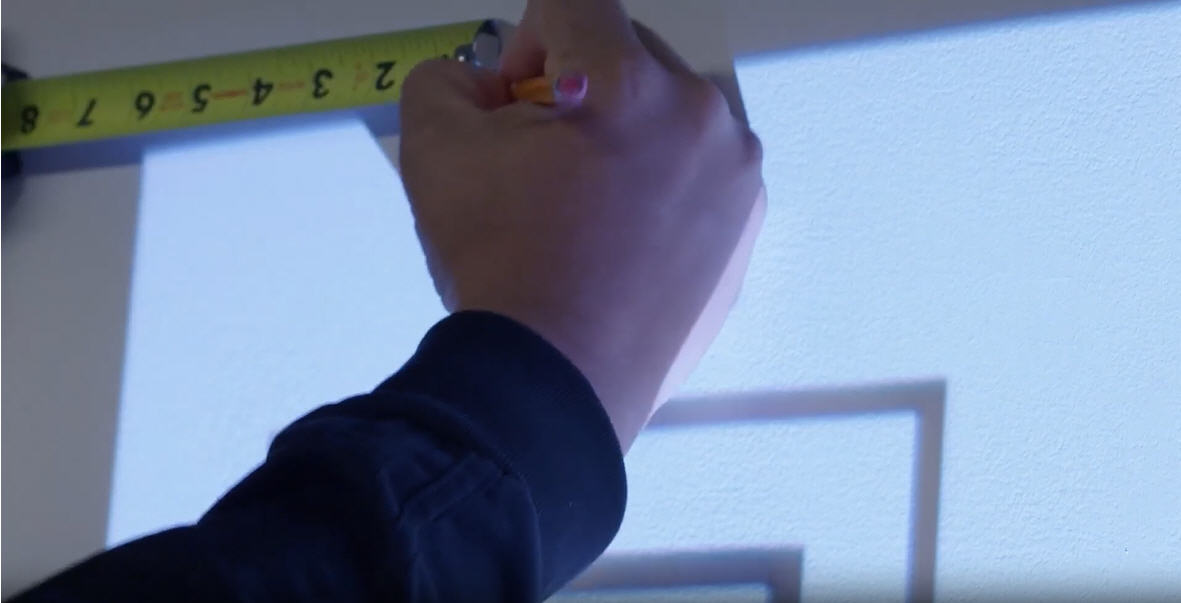
Step 2: Mark the Mounting Points
Measure the Distance Between Mounting Holes: Measure the distance between the mounting brackets or holes on the back of your projector screen. Ensure that these holes will align with the wall studs. If the studs don’t perfectly align with your screen’s mounting holes, you may need to use a mounting bracket or toggle bolts to put up the projector screen.
Note the Studs: Mark the spots on the studs where you will drill the holes. Double-check to ensure the holes correspond with the mounting points on the screen.
Measure and Mark: Using a measuring tape, measure from the floor to where the bottom of the screen will hang. Mark this height on the wall. Use a level to ensure the line is straight horizontally across the wall.
Step 3: Drill the Holes
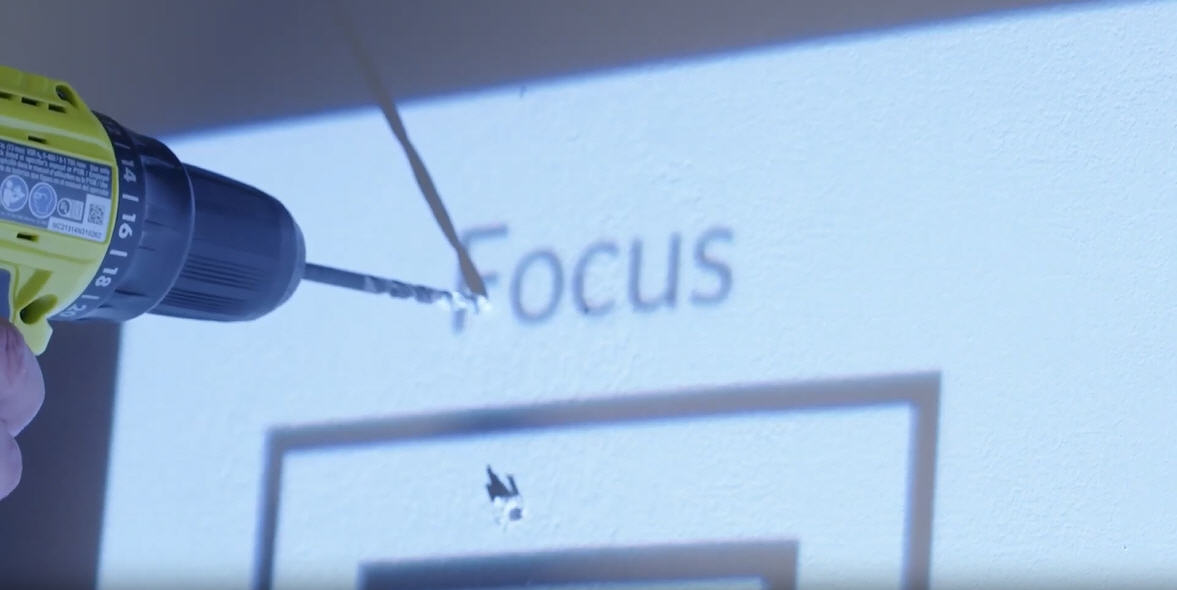
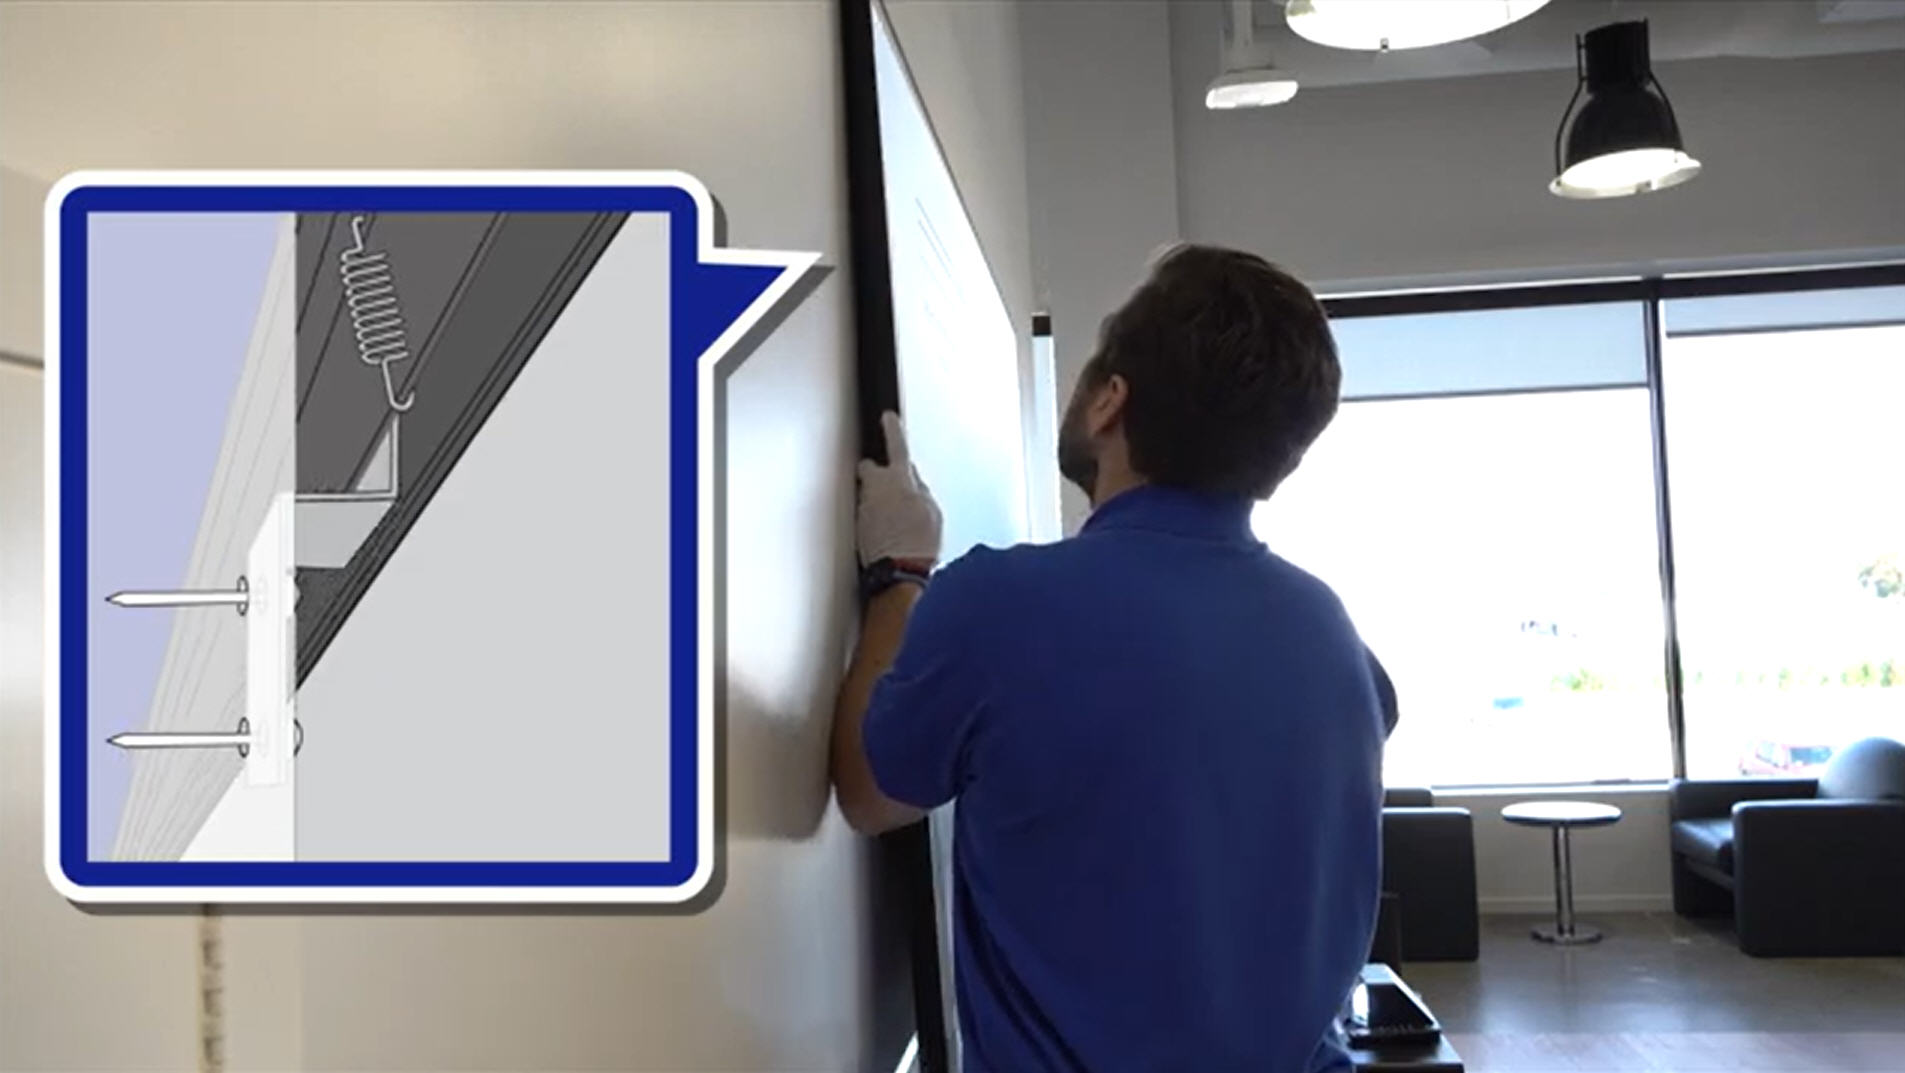
Once you’ve marked the placement for your screws, it’s time to drill.
- Drill Into Studs: Use a drill bit slightly smaller than your screws to pre-drill holes into the studs. This will help guide the screws and reduce the chance of cracking or damaging the drywall.
- If No Studs Are Available: If your mounting holes don’t align with the studs, you’ll need to use wall anchors or toggle bolts. Choose heavy-duty anchors designed for the weight of your screen. Drill pilot holes for the anchors or bolts, then insert them into the drywall.
Step 4: Install the Mounting Brackets or Screen
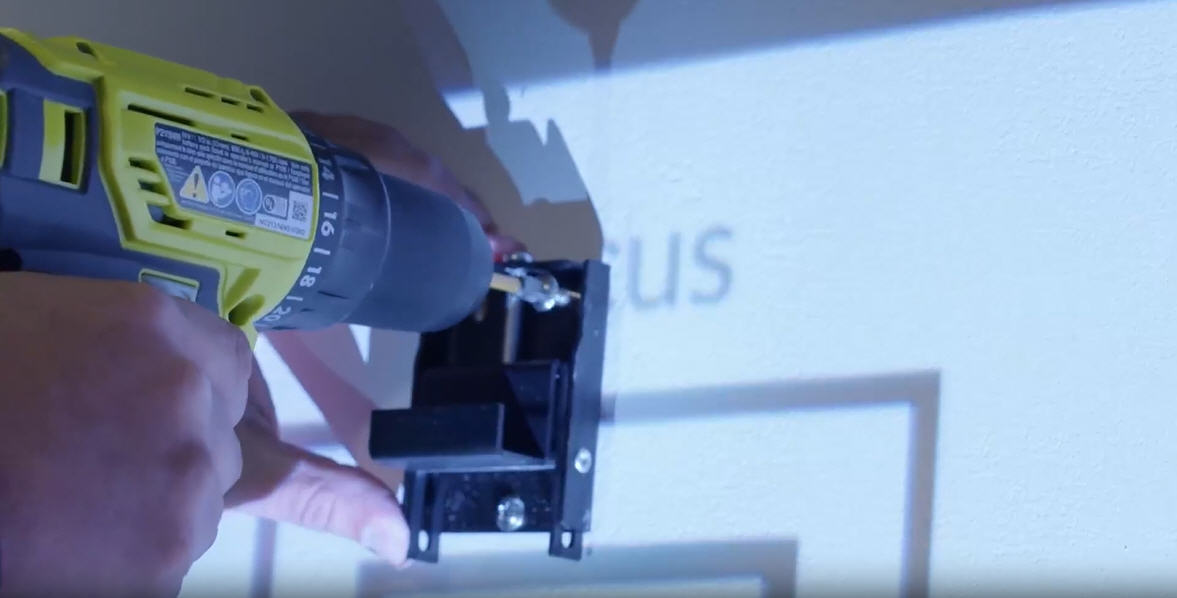
Depending on the design of your projector screen, you’ll either mount brackets or directly screw the screen to the sheetrock. Most screens come with instructions specific to their model, so follow those closely.
- Attach Mounting Brackets (if applicable): If your screen comes with separate mounting brackets, attach them to the wall first. Make sure they’re level before tightening them completely.
- Direct Mount (if applicable): If your screen has mounting points built into the housing, simply line them up with the pre-drilled holes and screw them into place using the screws and anchors or studs.
Step 5: Hang the Screen
Once the brackets are put in place, all you have to do is to hang the screen. Double check to make sure the brackets are secure then attach the screen to the brackets. It is highly recommended to have a second person help hold the screen in place while you attach it or hook it onto the wall brackets.
Avoid touching the projection surface as it can cause damage.
Step 6: Test the Screen

Once your screen is attached and secured onto the drywall, test it to make sure it works as expected.
- Fixed Screens: If you’re mounting a fixed-frame screen, check that the screen material is taut and free of wrinkles or sagging.
- Pull-Down Screens: For manual pull-down screens, pull the screen down and let it retract several times to ensure it operates smoothly and remains secure. Give it a few extra test tugs to make sure it won’t fall off the wall.
- Electric Screens: If you’re installing an electric screen, plug it in and test the remote or wall switch to ensure the screen raises and lowers without issue.
Once it’s tested, turn on your projector and make sure the projected image is lined up with the screen. If you need to, and are able to, adjust the screen placement as needed. If the projector is not perfectly aligned don’t panic! Many projectors have lens shift and keystone correction to adjust the image.
And that’s how you mount a projector screen onto drywall. Now you can enjoy your favorite TV shows and motion pictures on a large screen.
Additional Tips
Keep The Projector Running: To help you know exactly where the screen will be position keep the projector turned on.
Give Yourself Some Extra Wiggle Room: Many projector screen mounts require you to drop the screen into place so make sure there’s a bit of extra space below the ceiling to maneuver the screen.
Use a Mounting Bracket for Flexibility: If your screen’s mounting holes don’t align with the studs or you want more flexibility with placement, consider using a projector screen mounting bracket. These are designed to span across multiple studs, giving you more options for screen positioning.
Be Mindful of Electrical Wiring: Before drilling, be cautious of any electrical wiring in the walls. You can use a wire detector or avoid drilling near electrical outlets to minimize the risk of hitting live wires.
Consider Centering: If you want to center the screen perfectly on a wall where studs don’t align, install a horizontal wooden plank or mount a metal bracket spanning the studs, then attach the screen to that.
Final Verdict
Mounting a projector screen on drywall isn’t difficult with the right tools and planning. Taking the time to find the studs, measure accurately, and use appropriate anchors will ensure that your screen is securely attached and provides the best viewing experience possible. Whether you're mounting a pull-down, electric or fixed-frame screen, following these steps will result in a clean, professional installation that transforms your space into a home theater.
FAQs
Q: Can you mount a projector screen on a slanted wall?
Yes, however, it’s not advised. For example, placing a projector screen onto a wall with a slope can blur the image and strain the frame of the screen.
Q: Can I mount a projector screen directly into drywall?
Mounting a projector screen directly into drywall without proper support is not recommended. Drywall alone can’t support the weight of most projector screens. To ensure safety and stability, it’s best to mount the screen into wall studs or use heavy-duty anchors like toggle bolts if studs are unavailable.
Q: What type of anchors should I use for hanging a projector screen?
If wall studs aren’t available, you should use heavy-duty anchors such as toggle bolts or molly bolts, as they are designed to handle heavy loads. Avoid using basic plastic expansion anchors, as they generally aren’t strong enough for heavy objects like projector screens.
Q: How much weight can drywall hold?
Drywall can typically support 5 to 10 pounds without anchors. However, with heavy-duty anchors like toggle bolts, it can support 30 to 100+ pounds, depending on the size of the anchors and the quality of the drywall. If mounting into studs, gypsum board can hold 100 pounds or more. Keep in mind many screens above 150 inches weigh more than 100 pounds.
Q: What if the studs don’t align with my projector screen’s mounting holes?
If the studs don’t align with the mounting holes on your screen, you can use a mounting bracket or rail system that spans across the studs. This gives you more flexibility to attach the projector screen in the correct position while ensuring the weight is supported by the studs.
Q: How do I find wall studs behind drywall?
Use a stud finder to locate the studs behind your drywall. These tools detect changes in density behind the drywall to identify where the wooden studs are located. Most stud finders also alert you to the presence of electrical wires, so you can avoid drilling into them.
Q: How do I make sure the screen is level?
After marking the mounting points, use a level to ensure your projector screen will be straight. Check it again once the screen is mounted to confirm that it's properly aligned.
Q: Can I hang a motorized projector screen on drywall?
Yes, you can hang a motorized projector screen on drywall, but it’s important to ensure that the screen is securely anchored into wall studs or mounted with heavy-duty anchors that can handle the additional weight of the motor. Always check the weight of your screen and choose anchors rated for that load.
Q: Do I need special tools to hang a projector screen?
Basic tools like a drill, measuring tape, stud finder, level, and screws are usually sufficient. However, depending on your setup, you might need additional hardware like toggle bolts or mounting brackets. Having a ladder or step stool may also be necessary for positioning and securing the screen.
Q: How high should I mount my projector screen?
The ideal height depends on your room setup, but typically the bottom of the projector screen should be about 24-36 inches from the floor for comfortable viewing. Eye level when seated should be at the top of the lower third of the screen.
Q: Can I hang a projector screen from the ceiling instead of the wall?
Yes, many projector screens are designed to be wall or ceiling-mounted. This can be a good option if your walls cannot support the screen’s weight. Just make sure that your ceiling can handle the load and that you use the appropriate mounting hardware for the ceiling material.
Q: Should I hire a professional to install my projector screen?
If you’re unsure about finding studs, using the correct anchors, or if your screen is particularly large and heavy, it’s a good idea to hire a professional installer. They have the experience and tools necessary to ensure a safe and secure installation.
Special Features: | Tensioned |
Supported Resolution: | 4K, 8K |
Screen Type: | Electric |
Mount Type: | Wall and Ceiling |
Format: | HDTV [16:9] |
Brand: | Stewart Filmscreen |
Viewable Diagonal in.: | 100 |
Viewable Width in.: | 87 |
Viewable Height in.: | 49 |
Product Status: | Leaves Warehouse within 4-6 Weeks |
Gain: | 1.1 |
Surface Color: | White |
Case Color: | White |
Product Line: | Cima BC |
Front/Rear Projection: | Front |
Projection Surface: | Neve |
Supported Resolution: | 1080P |
Screen Type: | Manual |
Mount Type: | Wall and Ceiling |
Format: | HDTV [16:9] |
Brand: | Draper |
Viewable Diagonal in.: | 106 |
Viewable Width in.: | 92 |
Viewable Height in.: | 52 |
Product Status: | Leaves Warehouse within 5-10 Business Days |
Gain: | 1.0 |
Surface Color: | White |
Case Color: | White |
Product Line: | Luma |
Front/Rear Projection: | Front |
Projection Surface: | Matt White XT1000E |
Special Features: | Ambient Light Rejection, Ultra Short Throw |
Supported Resolution: | 4K |
Screen Type: | Fixed Frame, Ultra Short Throw |
Mount Type: | Wall |
Format: | HDTV [16:9] |
Brand: | Formovie |
Viewable Diagonal in.: | 100 |
Viewable Width in.: | 87 |
Viewable Height in.: | 49 |
Product Status: | In Stock |
Gain: | 1.0 |
Surface Color: | Gray |
Front/Rear Projection: | Front |
Special Features: | Ambient Light Rejection, Ultra Short Throw |
Supported Resolution: | 4K |
Screen Type: | Fixed Frame, Ultra Short Throw |
Mount Type: | Wall |
Format: | HDTV [16:9] |
Brand: | Spectra Projection |
Viewable Diagonal in.: | 100 |
Viewable Width in.: | 87 |
Viewable Height in.: | 49 |
Product Status: | In Stock |
Gain: | 0.5 |
Surface Color: | Gray |
Product Line: | Vantage |
Front/Rear Projection: | Front |
Projection Surface: | Vantage UST 0.5 |
Special Features: | Ambient Light Rejection, Ultra Short Throw |
Supported Resolution: | 4K |
Screen Type: | Fixed Frame, Ultra Short Throw |
Mount Type: | Wall |
Format: | HDTV [16:9] |
Brand: | Spectra Projection |
Viewable Diagonal in.: | 120 |
Viewable Width in.: | 104.6 |
Viewable Height in.: | 58.8 |
Product Status: | Leaves Warehouse within 4-6 Weeks |
Gain: | 0.5 |
Surface Color: | Gray |
Product Line: | Vantage |
Front/Rear Projection: | Front |
Projection Surface: | Vantage UST 0.5 |
Supported Resolution: | 4K, 8K, 16K |
Screen Type: | Fixed Frame |
Mount Type: | Wall |
Format: | HDTV [16:9] |
Brand: | Stewart Filmscreen |
Viewable Diagonal in.: | 110 |
Viewable Width in.: | 96 |
Viewable Height in.: | 54 |
Product Status: | In Stock |
Gain: | 1.3 |
Surface Color: | White |
Case Color: | Black |
Product Line: | WallScreen Deluxe |
Front/Rear Projection: | Front |
Projection Surface: | StudioTek 130 |
Special Features: | Ambient Light Rejection, Ultra Short Throw |
Supported Resolution: | 4K |
Screen Type: | Fixed Frame, Ultra Short Throw |
Mount Type: | Wall |
Format: | HDTV [16:9] |
Brand: | Spectra Projection |
Viewable Diagonal in.: | 150 |
Viewable Width in.: | 130.75 |
Viewable Height in.: | 73.5 |
Product Status: | Contact Us to Place Order |
Gain: | 0.5 |
Surface Color: | Gray |
Product Line: | Vantage |
Front/Rear Projection: | Front |
Projection Surface: | Vantage UST 0.5 |
Special Features: | Tensioned |
Supported Resolution: | 4K |
Screen Type: | Electric |
Mount Type: | Wall and Ceiling |
Format: | HDTV [16:9] |
Brand: | EluneVision |
Viewable Diagonal in.: | 100 |
Viewable Width in.: | 87 |
Viewable Height in.: | 49 |
Product Status: | Leaves Warehouse within 2-3 Weeks |
Gain: | 1.0 |
Surface Color: | White |
Case Color: | Black |
Product Line: | Reference Studio 4K 100 |
Front/Rear Projection: | Front |
Projection Surface: | Reference Studio 4K 100 |